
The most useful apps for real estate agents help you finish a specific job: prepare a listing, explain it clearly, follow up with a buyer, arrange a viewing or send approved paperwork. The difficulty is getting those jobs to connect. A polished video achieves little if the buyer’s question disappears into a message thread.
This guide covers 11 apps with interface screenshots, practical setup ideas and templates you can adapt. They cover the work around a listing, from preparing content to following up with buyers. That includes videotour.ai, which turns your property photos and listing details into a narrated video for your marketing and buyer conversations.
Start with one upcoming listing. Work through the relevant sections, keep the outputs together, and add tools only when they solve a recurring problem.
This guide covers 11 apps with interface screenshots, practical setup ideas and templates you can adapt. They cover the work around a listing, from preparing content to following up with buyers. That includes videotour.ai, which turns your property photos and listing details into a narrated video for your marketing and buyer conversations.
Start with one upcoming listing. Work through the relevant sections, keep the outputs together, and add tools only when they solve a recurring problem.
Summary
Create an AI Video Tours from PhotosTry it For Free
Compare 11 apps for real estate agents
| App | Use it when you need to… | Finish with… |
|---|---|---|
| ElevenLabs | Create narration or dub an existing introduction | A reviewed audio or language version |
| DocuSign | Collect signatures on approved documents | A tracked signing request and completed file |
| HubSpot | Keep buyer requirements and follow-ups together | A contact record with a dated next action |
| Calendly | Offer clear appointment times | A booking link with realistic availability |
| Loom | Explain a shortlist or answer a specific question | A short personal recording |
| Notion | Coordinate listing preparation | A checklist with owners and deadlines |
| Perplexity | Find background information and its sources | A brief with links you have checked |
| Claude | Turn verified facts into clear copy | A reviewed description, script and captions |
| CapCut | Refine footage or a finished social video | An edit with corrected, readable subtitles |
| Google Lens | Read or extract text from an image | Checked text you can put into your notes |
| VideoTour.ai | Turn listing photos and details into a narrated video | A reviewed property tour ready to share |
Product information checked in October 2026. The screenshots show real interfaces from official guides and product demonstrations, plus a live Perplexity example. Demo records are examples; some layouts and labels vary by version. The cover is an AI-generated editorial image; the in-article screenshots show actual app interfaces. The apps are grouped as a practical toolkit, not a tested performance ranking.
1. ElevenLabs: create AI voiceovers and dub property videos
ElevenLabs is useful when you need a standalone narration track or a different-language version of an existing recording. Voice cloning creates a reusable voice for new scripts. Dubbing adapts speech that has already been recorded.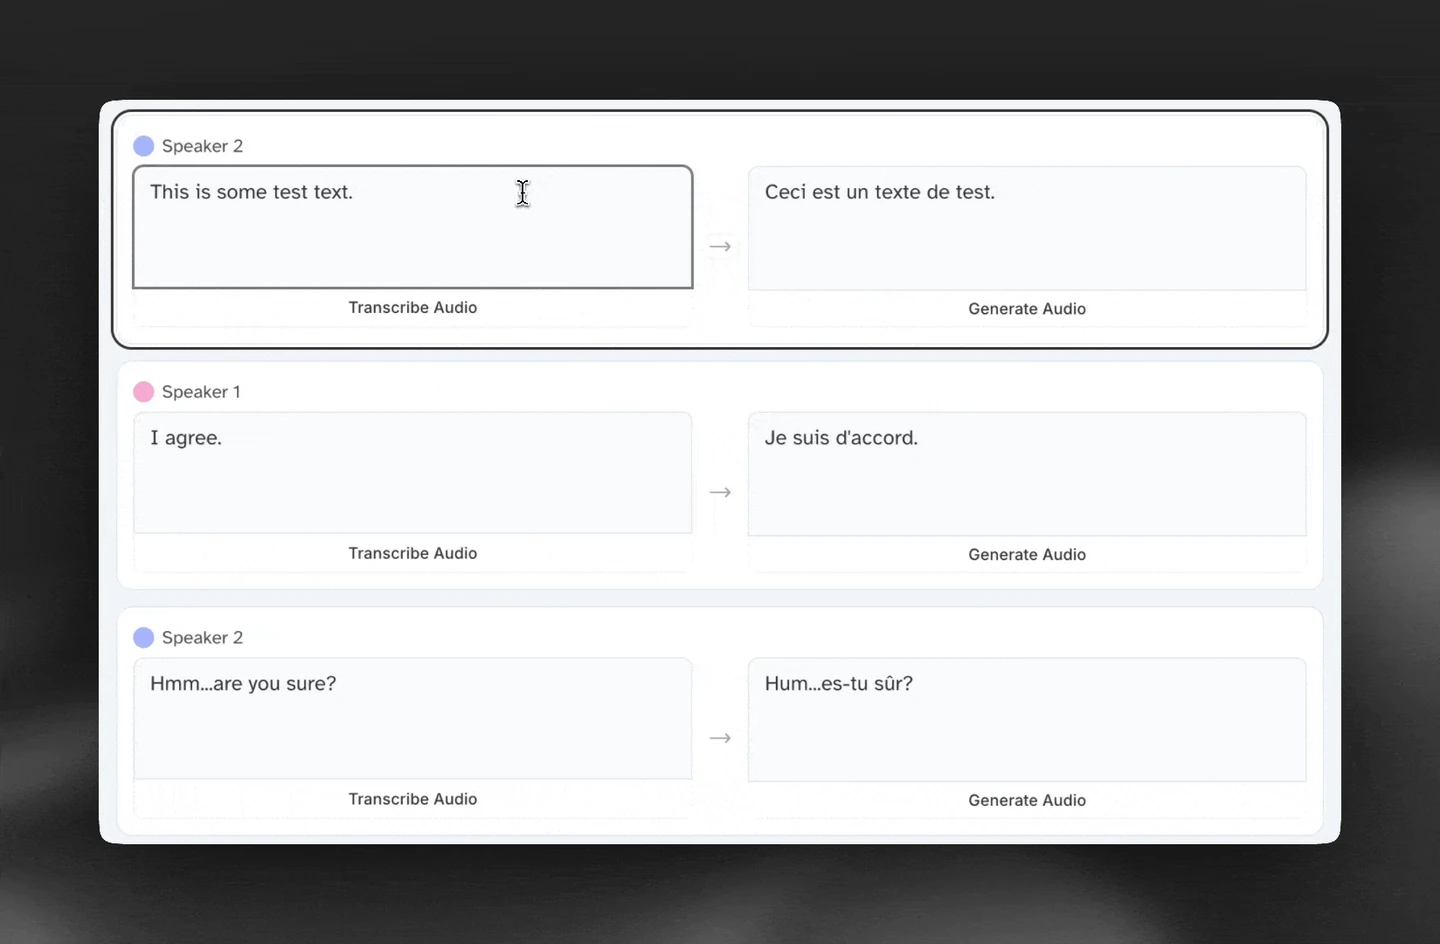 ElevenLabs Dubbing Studio: review the original and translated lines before generating audio. Interface capture from the official documentation demo. Source.
Save the approved script beside the final audio. That makes a later price or availability update easier to trace. If your goal is a complete property video from photos, the voiceover workflow in videotour.ai can handle narration within the video creation process.
ElevenLabs Dubbing Studio: review the original and translated lines before generating audio. Interface capture from the official documentation demo. Source.Create and review your first property voiceover
- Approve the words first. Write an introduction with the property type, location, two concrete features and one next step. Remove claims you cannot verify before recording or generating speech.
- Choose the right workflow. Use your own authorized voice for new narration, or start from a clean recording when dubbing an existing introduction. In Dubbing Studio, review the original transcript alongside the translated lines.
- Review the result aloud. Listen for building names, abbreviations, prices and units. For another language, ask a fluent speaker to check meaning and pronunciation before you share it.
Save the approved script beside the final audio. That makes a later price or availability update easier to trace. If your goal is a complete property video from photos, the voiceover workflow in videotour.ai can handle narration within the video creation process.
2. DocuSign: collect signatures on real estate documents
DocuSign eSignature handles the sending and signing stage. The practical benefit for an agent is a clear record of which document went to whom and what still needs attention.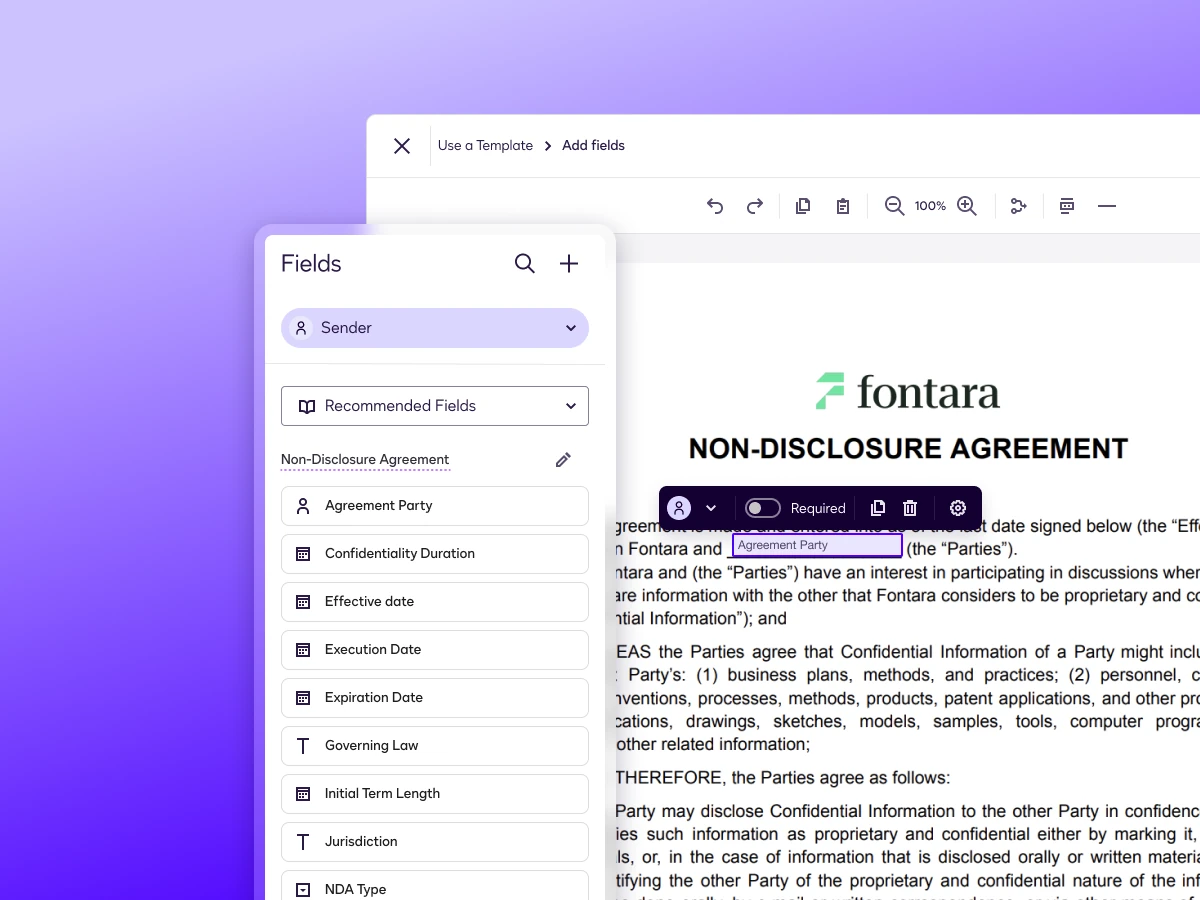 Docusign’s field-placement interface, shown with its sample document. Select the recipient before assigning fields. Official product demonstration. Source.
Docusign’s field-placement interface, shown with its sample document. Select the recipient before assigning fields. Official product demonstration. Source.Set up a repeatable document-signing process
- Start with the approved version. Use the document and process your brokerage requires. Give the file a recognizable name containing the property reference and version date.
- Check recipients and fields. Confirm names, email addresses and any signing order. Select the correct recipient when assigning signature, date and other required fields.
- Preview, send and track. Review the recipient experience before sending. After completion, save the finished file in the agreed transaction folder and update the related task.
3. HubSpot: manage buyer leads and follow-ups
HubSpot can give contacts, deals and follow-up work a shared home. For an agent, the useful test is simple: open a buyer record and see their requirements, what you last sent and what you promised to do next.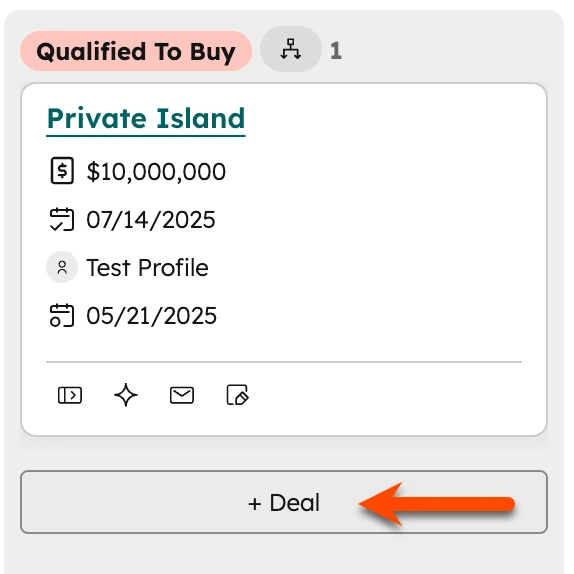 HubSpot’s example deal card and add-deal control. The sample property and amount belong to the vendor’s documentation. Source.
HubSpot’s example deal card and add-deal control. The sample property and amount belong to the vendor’s documentation. Source.Create a buyer record with a clear next action
- Record the brief. Save budget range, preferred areas, property requirements, timeframe and contact preference in appropriate fields or a consistent note.
- Record the conversation. Log the specific property or video you shared and the buyer’s response. “Sent options” is less useful than “Sent listings A and B; buyer asked about balcony access.”
- Set a dated task. Write an action you can complete, such as “Confirm balcony access with the listing agent, then reply by Thursday.” Assign its owner.
Buyer goal: [stated goal]. Must-haves: [requirements]. Options discussed: [references]. Main question: [question]. Next action: [specific action]. Owner and due date: [name/date]. Follow-up channel: [agreed channel].A possible deal-stage sequence is New enquiry → Requirements confirmed → Shortlist sent → Viewing arranged → Offer discussion → Closed or paused. Adapt it to your brokerage. If another CRM already works, use this structure there instead of creating a second buyer database.
4. Calendly: schedule buyer calls and property viewings
Calendly helps people choose a time from your available slots. A useful real estate setup distinguishes an initial conversation from a property viewing, because they require different preparation and access arrangements.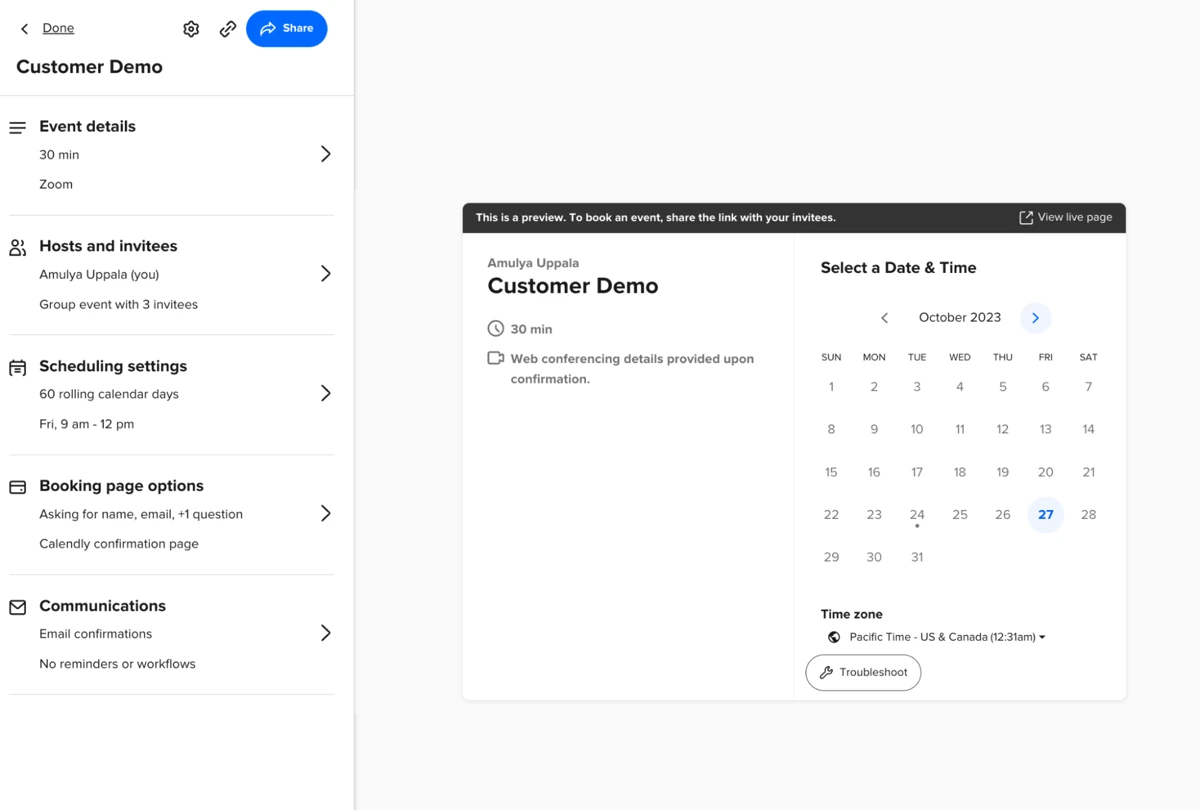 Calendly’s event editor and invitee preview. This official guide shows an earlier layout; current menu labels may differ. Source.
The event-type editor lets you set details such as duration, location and availability, then preview the booking page. Use the following as a starting point, adjusting it to your schedule:
Connect and check the calendar used for conflicts, review time zones, and preview the invitee experience. Then give the link context: “Choose a time for a short call about the two apartments I sent.” If a seller must approve access first, make that approval part of your process before offering the viewing slot.
Calendly’s event editor and invitee preview. This official guide shows an earlier layout; current menu labels may differ. Source.The event-type editor lets you set details such as duration, location and availability, then preview the booking page. Use the following as a starting point, adjusting it to your schedule:
| Setting | Buyer introduction | Property viewing |
|---|---|---|
| Event name | 15-minute property search call | Viewing: [property reference] |
| Duration | 15 minutes as a starting point | Allow for the actual tour length |
| Location | Your chosen call method | Clear meeting point or confirmation instructions |
| Availability | Dedicated call windows | Only times when property access is confirmed |
| Buffer | Enough time to record notes | Travel, parking and key handover time |
| Useful question | Which areas and property types interest you? | Which property would you like to view? |
5. Loom: explain property shortlists with personal video
Loom records your screen and camera. Use it when your explanation is the valuable part: comparing floor plans, answering a layout question or walking one buyer through a shortlist.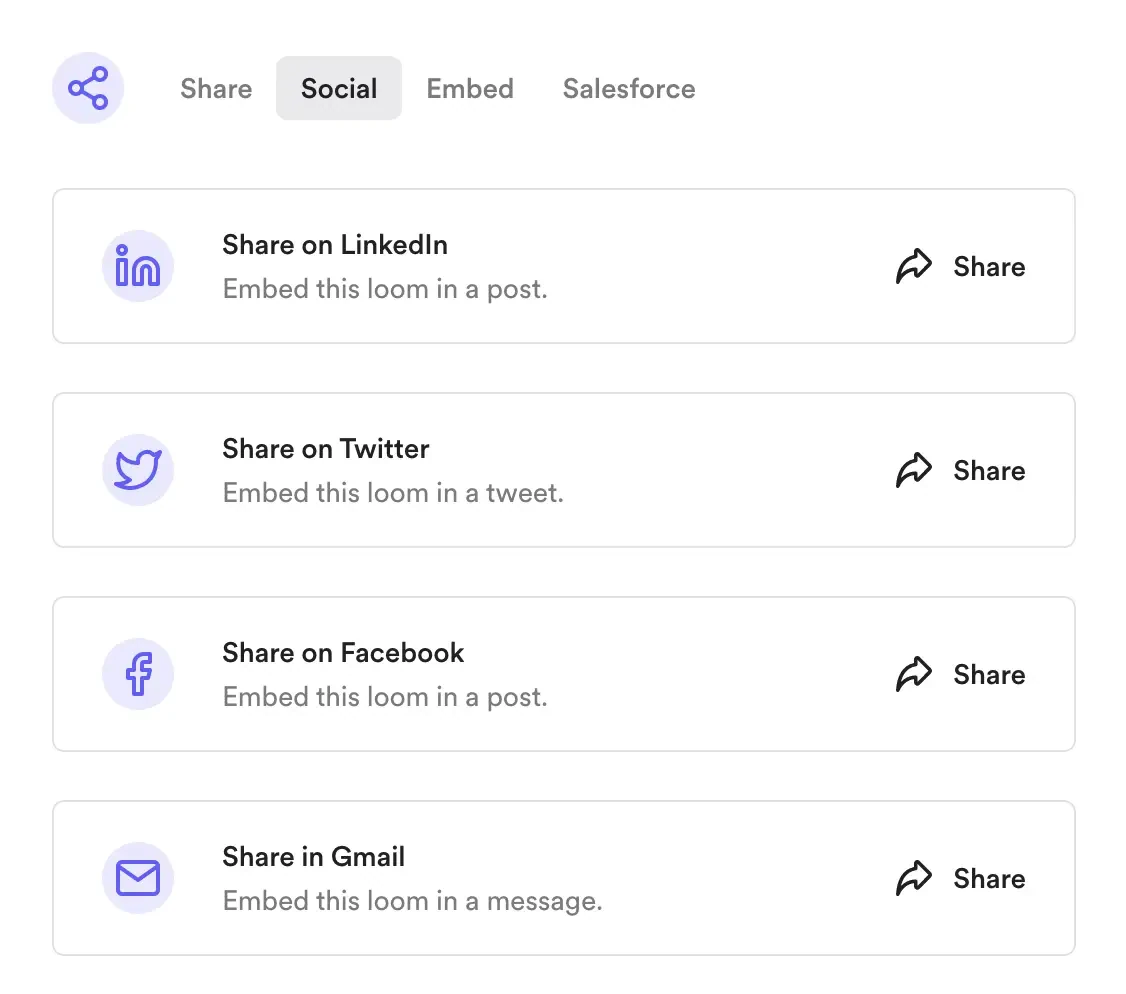 Loom’s sharing menu. Before sending a recording, check who can open the link. Screenshot from Atlassian’s Loom guide. Source.
Save that link in the CRM note. For a reusable marketing presentation of one property, create a finished listing video in videotour.ai; use the Loom message to add a personal explanation around it.
Loom’s sharing menu. Before sending a recording, check who can open the link. Screenshot from Atlassian’s Loom guide. Source.A 90-second property shortlist video script
- 0–15 seconds: repeat the buyer’s priorities: “You asked for a separate workspace and outdoor space.”
- 15–45 seconds: show option A and point to the relevant features on the listing or floor plan.
- 45–75 seconds: show option B, explain the tradeoff and identify any detail you still need to confirm.
- 75–90 seconds: ask one decision question: “Which layout should we arrange to see first?”
Save that link in the CRM note. For a reusable marketing presentation of one property, create a finished listing video in videotour.ai; use the Loom message to add a personal explanation around it.
6. Notion: organize your listing launch checklist
Notion boards make it easier to see which listings are waiting for material, editing or review. The useful feature is visibility: each piece of work has a status, an owner and a next step.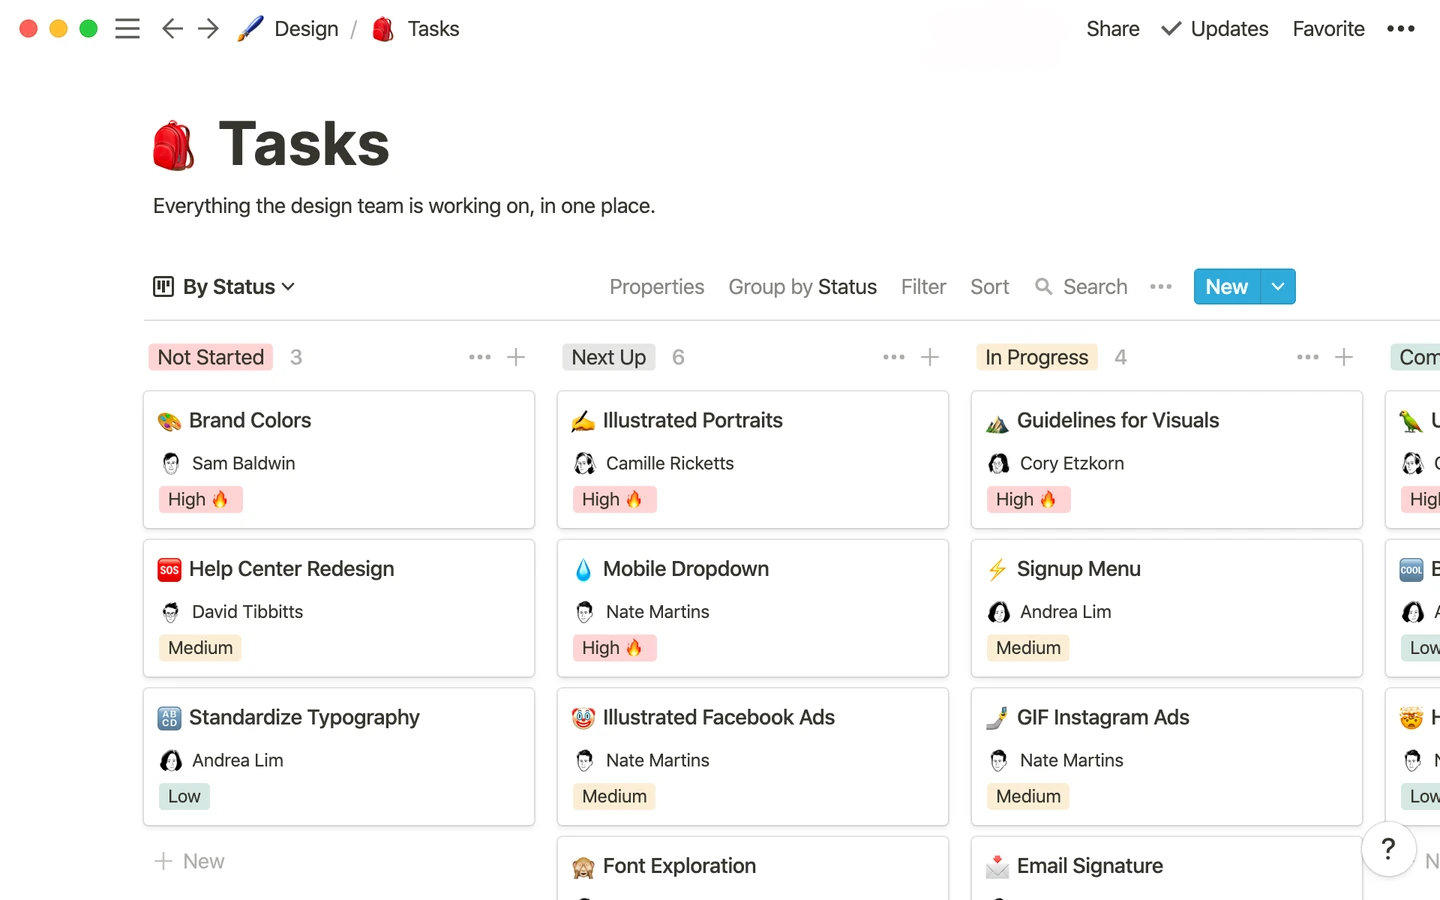 Notion’s official task-board example uses design projects. Apply the same status-and-owner structure to listing preparation. Source.
Create a listing database with a card for each property. Suggested fields are property reference, launch date, owner, status, photo-folder link, approved-copy link and final-video link. Group the board by a status such as Materials needed, In production, Ready for review or Published.
Notion’s official task-board example uses design projects. Apply the same status-and-owner structure to listing preparation. Source.Create a listing database with a card for each property. Suggested fields are property reference, launch date, owner, status, photo-folder link, approved-copy link and final-video link. Group the board by a status such as Materials needed, In production, Ready for review or Published.
Copy this listing launch checklist
- Property facts checked against the approved source.
- Photos selected and arranged in a sensible viewing order.
- Listing description and narration reviewed.
- Video checked with sound on and off.
- Booking or enquiry link tested.
- Final approval recorded with the reviewer’s name and date.
- Published links saved and buyer follow-up assigned.
7. Perplexity: research neighborhoods with sources
Perplexity can help locate web sources for a neighborhood question. Use the answer to find the evidence, then open the original pages before incorporating claims into a listing.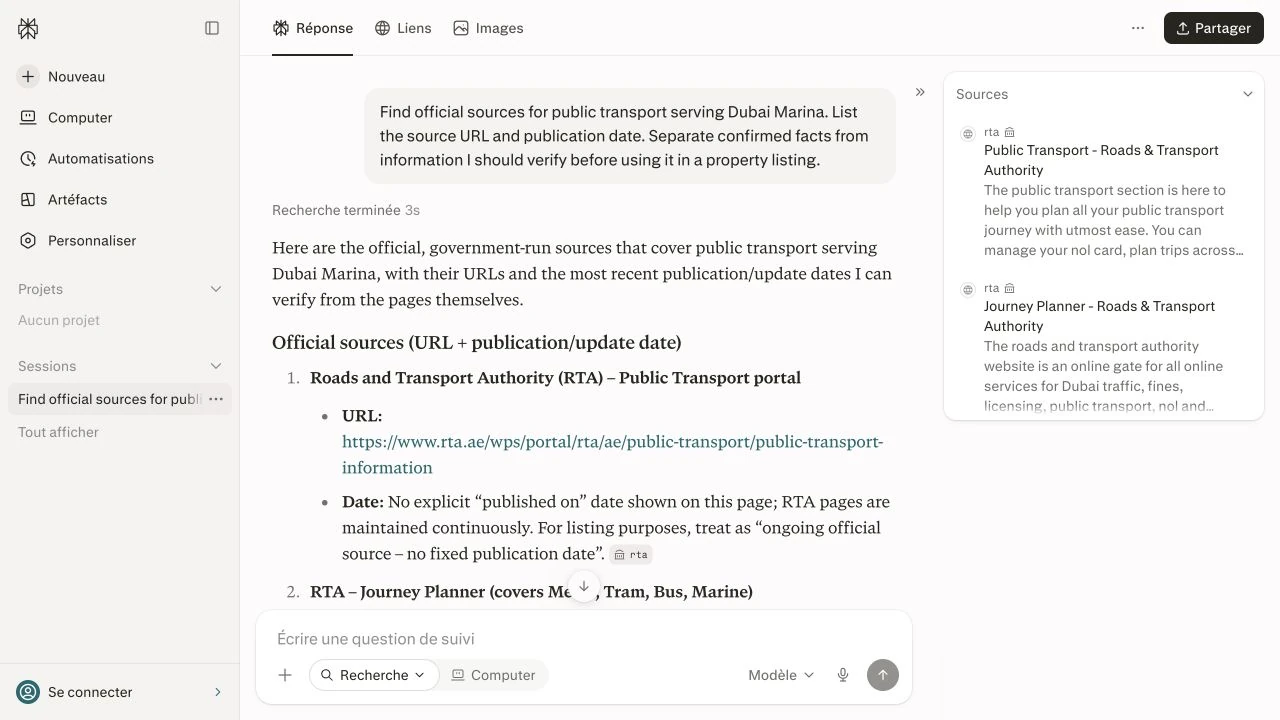 Live Perplexity example captured for this guide: a Dubai Marina research question with source links open. The app navigation is in French; the query and answer are in English. Source.
Live Perplexity example captured for this guide: a Dubai Marina research question with source links open. The app navigation is in French; the query and answer are in English. Source.A neighborhood research prompt you can reuse
Find official sources for public transport serving [area, city]. Give the source URL and publication or update date when available. Separate current services from proposed projects. List what I should verify for a specific property address before writing marketing copy. If a fact or date is unclear, say so.In the screenshot, we used a Dubai Marina question and opened the source panel. That is the useful next action: go from the generated summary to the transport operator’s own information.
- Check the source. Prefer the relevant operator, municipality or original publisher for factual claims.
- Check the place and date. A neighborhood-wide description does not establish the walking route from a particular building. A proposed station is different from an operating one.
- Save an evidence note. Record the claim, source URL, date checked and any unresolved question beside your listing brief.
8. Claude: write listing descriptions and video scripts
Claude is useful for turning a structured brief into a first draft. The quality of that brief matters: room count, area and units, approved features, audience, tone and the next action you want the reader to take.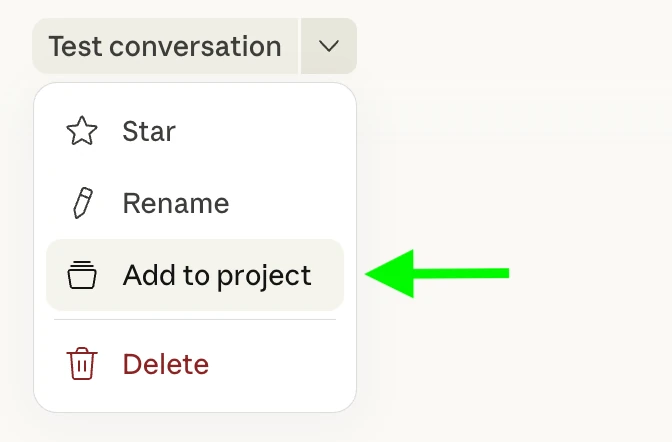 Claude’s Add to project control keeps a drafting conversation with its reusable context. Screenshot from the official Help Center. Source.
For recurring work, keep your approved style guidance in a Claude project. Start a separate conversation for each listing so the property facts remain easy to identify. The screenshot shows how to add a conversation to a project.
Review in two passes: first compare every property claim and number with the fact sheet. Then remove repetition and generic phrases. Replace “an exceptional lifestyle opportunity” with the specific feature the buyer will see. Approve one final version and use those same facts in the listing page, video and captions.
Claude’s Add to project control keeps a drafting conversation with its reusable context. Screenshot from the official Help Center. Source.For recurring work, keep your approved style guidance in a Claude project. Start a separate conversation for each listing so the property facts remain easy to identify. The screenshot shows how to add a conversation to a project.
A prompt for listing copy, narration and captions
You are helping me prepare property marketing copy. Use only the verified facts below. Draft: (1) a 100-word listing description, (2) a 45-second narration of about 90–110 words, and (3) two social captions under 40 words each. Use clear, specific language. Do not invent views, amenities, distances, travel times, measurements or investment returns. Keep units exactly as supplied. End with [my chosen call to action]. Put missing information in a separate Questions list. Facts: [paste approved fact sheet]. Tone example: [paste a short approved example].The narration length is a drafting target; the spoken pace determines the actual duration. Read it aloud and shorten it if necessary.
Review in two passes: first compare every property claim and number with the fact sheet. Then remove repetition and generic phrases. Replace “an exceptional lifestyle opportunity” with the specific feature the buyer will see. Approve one final version and use those same facts in the listing page, video and captions.
9. CapCut: edit property videos and add captions
CapCut’s caption and editing tools are useful when you have footage or a finished video that needs a tailored social edit. Use it for a specific improvement, such as a tighter opening, shorter duration or clearer subtitles.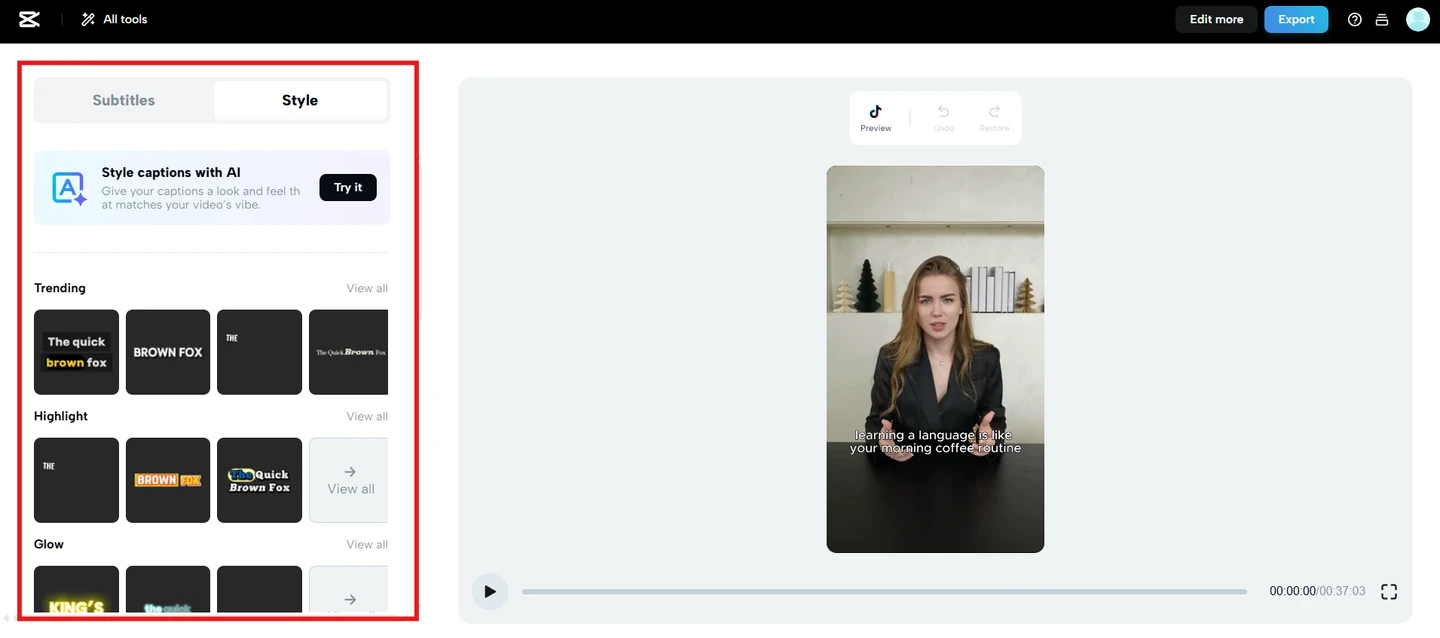 CapCut’s subtitle styling interface. Use the preview to check readability before exporting. Screenshot from the official tutorial. Source.
CapCut’s subtitle styling interface. Use the preview to check readability before exporting. Screenshot from the official tutorial. Source.Review the opening, captions, framing and export
- Opening: show a relevant property feature immediately. Remove empty lead-in footage and repeated introductions.
- Captions: generate or add subtitles, then correct building names, numbers, units and punctuation. Choose a style with enough contrast against the rooms shown.
- Framing and sound: preview the intended aspect ratio. Keep essential text clear of social-app controls and lower music where it competes with narration.
- Export: watch the exported file on a phone, with sound on and off. Confirm the closing contact information and call to action are readable.
10. Google Lens: extract text from property images
Google Lens can help you work with text inside an image, such as a printed brochure or equipment label. It is particularly useful while you are away from your desk and would otherwise retype the information.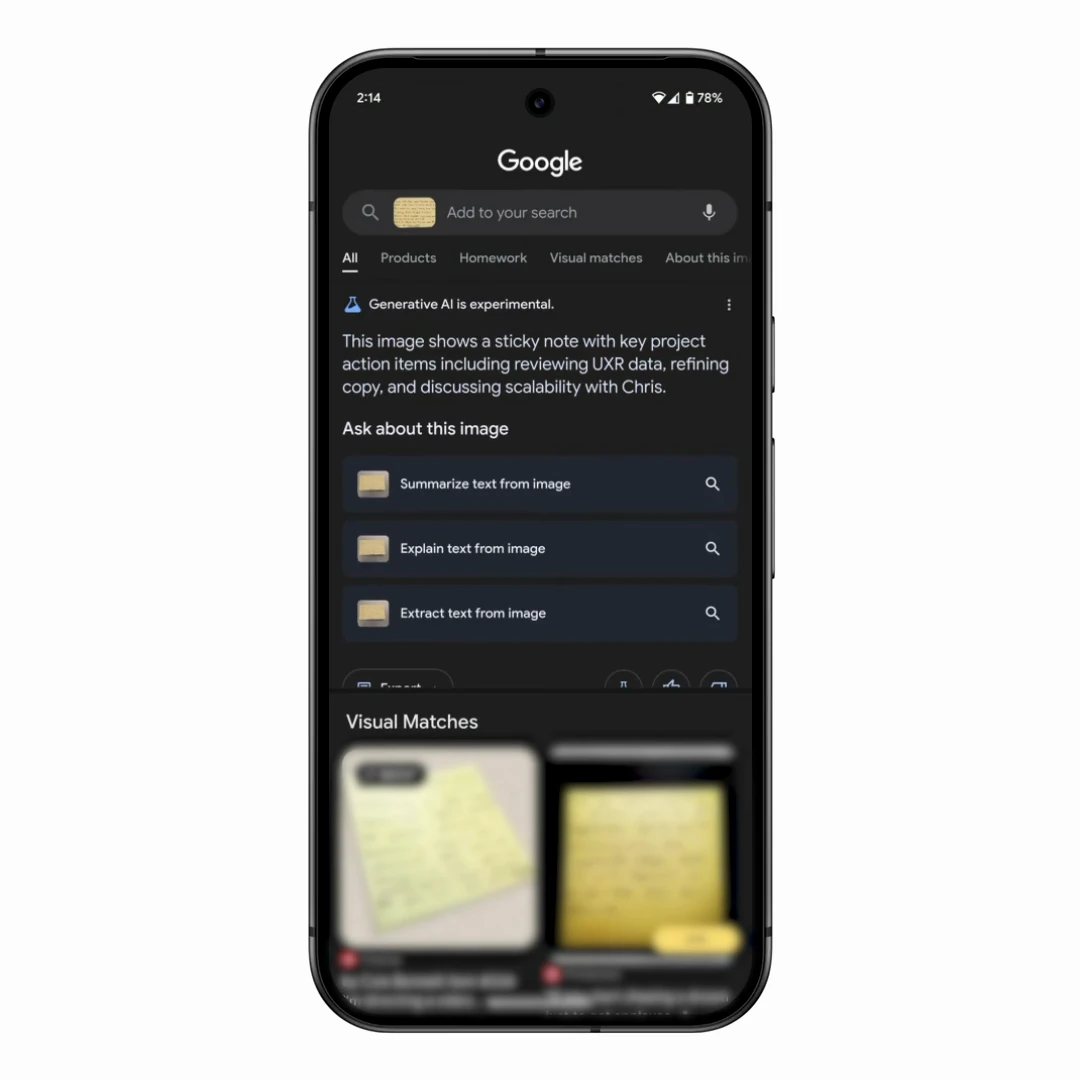 Google Lens text tools in Google’s official product demo. For listing facts, compare extracted text with the original. Source.
Google Lens text tools in Google’s official product demo. For listing facts, compare extracted text with the original. Source.- Use a clear image. Frame the relevant text and avoid glare or a steep angle.
- Select the text task. Extract or copy the passage you need, rather than relying on a broad visual guess about the property.
- Compare and save. Check names, decimal points and units against the original. Keep the source image beside the extracted text.
11. VideoTour.ai: turn listing photos into narrated videos
videotour.ai brings the visual part of your listing workflow into one project: property photos, a spoken tour, captions, music and agent branding. It is particularly useful when you have good listing photos and want a video that helps buyers understand the property before arranging a viewing.
For example, you could prepare a vertical tour for social media or a wide version for a website, then use the finished video in your buyer follow-up. The practical aim is a clear journey through the home, with the right words accompanying each space.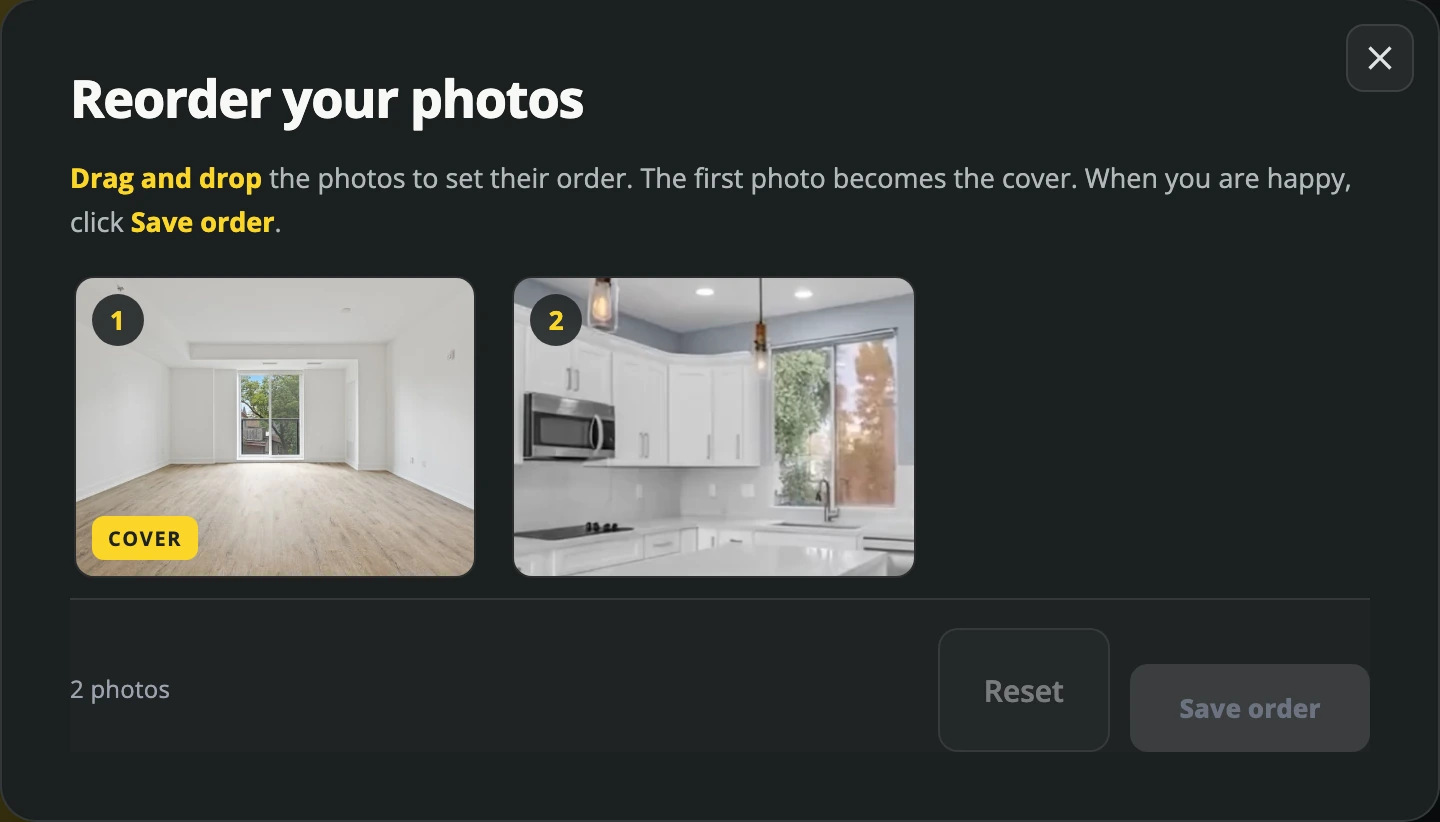 Arrange the property photos before generating. This Help Center example shows the photo-ordering controls. View full size · Step-by-step guide.
Let the app arrange the photos, or use Reorder photos to choose your own sequence. A useful starting order is exterior, entrance, living area, kitchen, bedrooms and outdoor space. Give each photo a job: establish the property, explain a room or show a feature worth noticing. The first-video guide walks through the setup.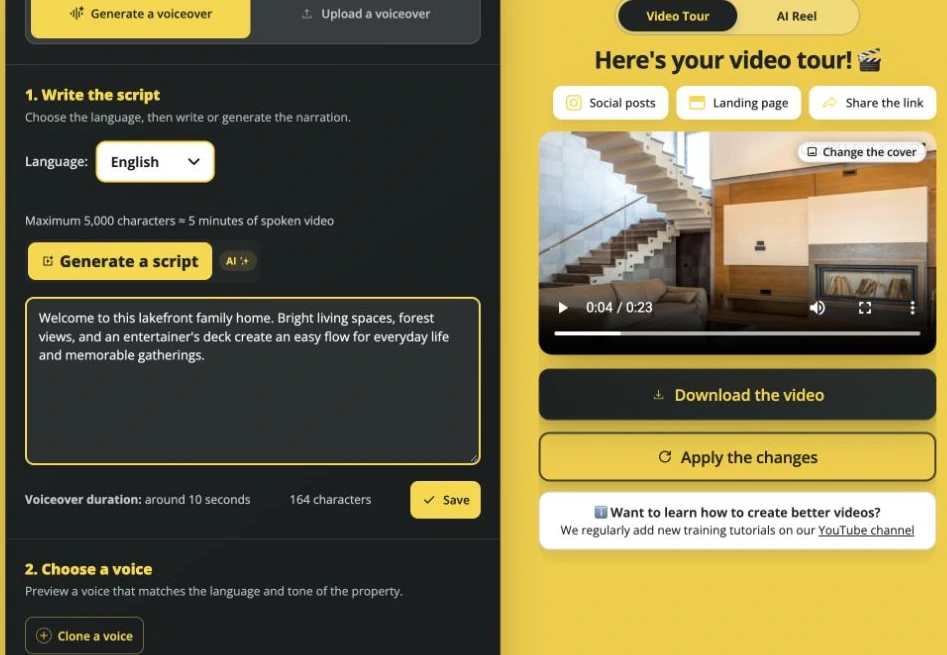 The Voiceover tab keeps the script and finished-video preview in view. Screenshot from the VideoTour.ai product demo. View full size · Step-by-step guide.
Read the draft in the order the rooms appear. Give the kitchen sentence to the kitchen scene, and put the invitation to book a viewing near the end. Use short sentences you would naturally say to a buyer. If the script is locked, select Modify, edit it and choose Save.
Useful distinction: Save stores your words. In an existing tour, Generate voiceover creates the spoken recording. After a script change, update the audio and allow scene matching to finish before applying the video changes. The voiceover guide explains each step.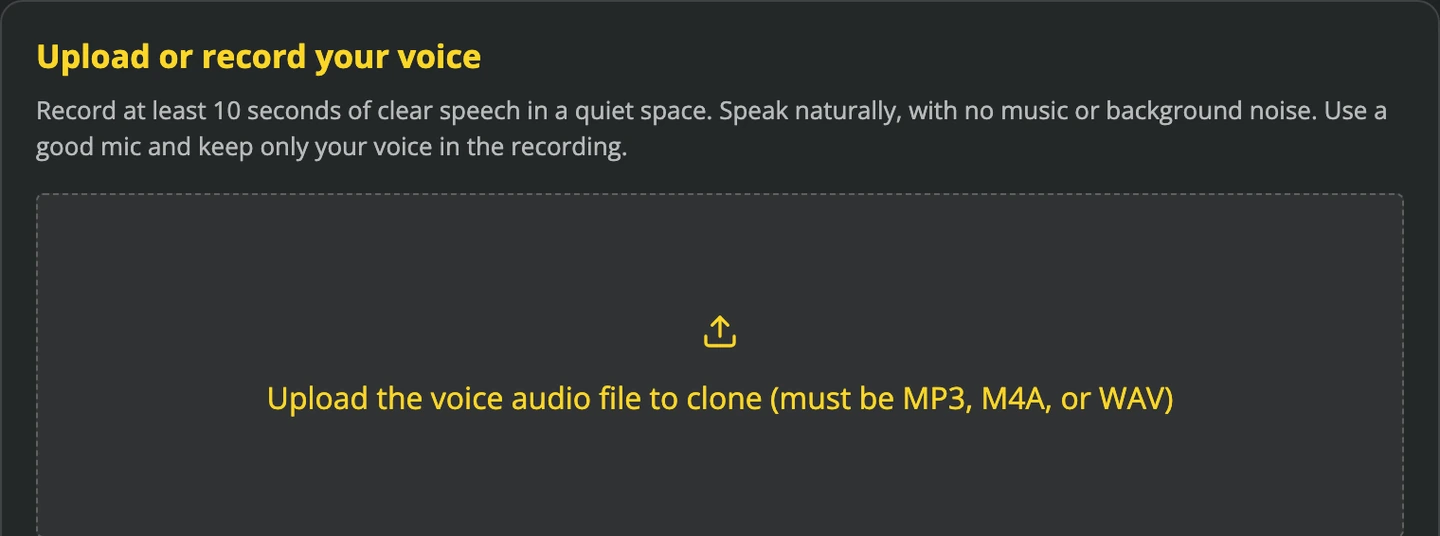 Create a reusable voice in My branding, then select it when preparing a listing’s narration. Official Help Center screenshot. View full size · Step-by-step guide.
To set it up, open My branding → AI voices → Clone a voice. Use a clean recording with one speaker, no music and little background noise. Follow the upload guidance, give the voice a recognizable name, then return to the tour and select it. Use your own voice or one you have explicit permission to reproduce. See how to create a reusable voice.
Listen to the actual property narration before moving on. Street names, local place names, prices and measurements deserve a careful check. A voice preview helps you choose a sound; the generated narration tells you whether this particular script works.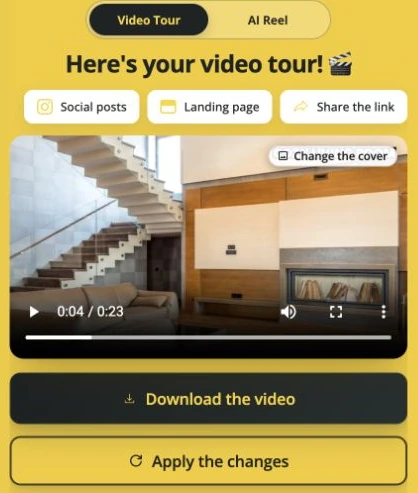 Review the tour, apply the latest edits and download the finished version. Screenshot from the VideoTour.ai product demo. View full size · Step-by-step guide.
After changing captions, scene order, music or narration, select Apply the changes and wait for the updated video. Then review and download that version. This matters because saving an edit does not replace a file you downloaded earlier. The guide to applying edits explains the difference.
For example, you could prepare a vertical tour for social media or a wide version for a website, then use the finished video in your buyer follow-up. The practical aim is a clear journey through the home, with the right words accompanying each space.
Step 1: import listing photos and arrange the rooms
In Create a video, upload your property photos or paste a supported property link into Listing URL and select Import Listing. Review the photos and imported details before continuing. Choose the agent for this listing and the format that fits where you plan to share it.Arrange the property photos before generating. This Help Center example shows the photo-ordering controls. View full size · Step-by-step guide.Let the app arrange the photos, or use Reorder photos to choose your own sequence. A useful starting order is exterior, entrance, living area, kitchen, bedrooms and outdoor space. Give each photo a job: establish the property, explain a room or show a feature worth noticing. The first-video guide walks through the setup.
Step 2: write and review the property video script
You can prepare narration during creation or open Voiceover in an existing tour. Choose the language, write your own words or select Generate a script. In the script generator, check the property description and address, then choose an energy level and communication style.The Voiceover tab keeps the script and finished-video preview in view. Screenshot from the VideoTour.ai product demo. View full size · Step-by-step guide.Read the draft in the order the rooms appear. Give the kitchen sentence to the kitchen scene, and put the invitation to book a viewing near the end. Use short sentences you would naturally say to a buyer. If the script is locked, select Modify, edit it and choose Save.
Useful distinction: Save stores your words. In an existing tour, Generate voiceover creates the spoken recording. After a script change, update the audio and allow scene matching to finish before applying the video changes. The voiceover guide explains each step.
Step 3: choose an AI narrator or clone your voice
Preview an available narrator, use your own cloned voice, or upload a finished recording for that property. A reusable voice clone is helpful when you want new listing scripts read in a consistent voice without recording every introduction again.Create a reusable voice in My branding, then select it when preparing a listing’s narration. Official Help Center screenshot. View full size · Step-by-step guide.To set it up, open My branding → AI voices → Clone a voice. Use a clean recording with one speaker, no music and little background noise. Follow the upload guidance, give the voice a recognizable name, then return to the tour and select it. Use your own voice or one you have explicit permission to reproduce. See how to create a reusable voice.
Listen to the actual property narration before moving on. Street names, local place names, prices and measurements deserve a careful check. A voice preview helps you choose a sound; the generated narration tells you whether this particular script works.
Step 4: review the tour, apply changes and download
Watch the tour with sound, then once without sound. Check that the room sequence makes sense, spoken details match the images, on-screen text is readable and the agent details are correct. Set the music low enough for the narration to remain clear.Review the tour, apply the latest edits and download the finished version. Screenshot from the VideoTour.ai product demo. View full size · Step-by-step guide.After changing captions, scene order, music or narration, select Apply the changes and wait for the updated video. Then review and download that version. This matters because saving an edit does not replace a file you downloaded earlier. The guide to applying edits explains the difference.
Step 5: share the video and plan the buyer follow-up
- Social post: use Download the video to save the finished file, then upload it to the channel you chose. Check the download guide if you need help finding it on your device.
- Buyer follow-up: share a viewing link with a sentence connecting the property to that buyer’s requirements and one clear next step.
- Team handoff: save the approved video link in your listing checklist and record which buyers received it in your CRM.
A step-by-step real estate marketing workflow
Here is a repeatable sequence for a property you are preparing to market. Use the tools you already have wherever they cover the same job.
- Build one approved fact sheet. Gather property details, photos, floor plan, availability and the questions still awaiting an answer. Use Lens only when text needs extracting; use Perplexity when background research is needed.
- Create the production checklist. Give each unfinished task an owner and deadline in Notion or your existing project tool.
- Prepare the content. Draft and review copy with Claude if useful. Create the narrated property video in videotour.ai. Add a separate dubbing or editing step only when the audience or format needs it.
- Match the content to the buyer. Send the property video with a relevant message. Add a short Loom explanation if there is a layout comparison or specific question to discuss.
- Make the next step clear. Offer a suitable call or confirmed viewing time through your booking process. Log the response and a dated next action in the CRM.
- Handle the paperwork at the appropriate stage. Use the brokerage-approved document and signing process, then save the completed file and update the task.
A buyer follow-up message to send with your video
Hi [name], you mentioned [specific requirement]. This property may be worth a closer look because [verified matching feature]. Here is the short tour: [video link]. One point still to confirm is [open question, if any]. Would you prefer [relevant next step A] or [relevant next step B]?Use one clear ask. A first enquiry may need a requirements call; an engaged buyer may be ready for a viewing. Record the agreed next step immediately after the conversation.
How to measure time saved and buyer follow-up
For your next few listings, keep a small scorecard. Measure time from complete materials to approved content, revisions needed after review, enquiries receiving a dated follow-up, and appointments actually booked.
Record the starting point before adding another subscription, then compare similar listings and channels. A useful tool either reduces repeated work, improves the clarity of the output or helps you complete an action that was being missed. Results also depend on the property, audience and follow-through.
Begin with the most obvious gap. If buyers receive disconnected photos, try a coherent property tour. If replies are being missed, fix the CRM routine. If appointments take too many messages, improve booking availability. You can start your next listing video with videotour.ai and connect it to the follow-up process you use every day.
Record the starting point before adding another subscription, then compare similar listings and channels. A useful tool either reduces repeated work, improves the clarity of the output or helps you complete an action that was being missed. Results also depend on the property, audience and follow-through.
Begin with the most obvious gap. If buyers receive disconnected photos, try a coherent property tour. If replies are being missed, fix the CRM routine. If appointments take too many messages, improve booking availability. You can start your next listing video with videotour.ai and connect it to the follow-up process you use every day.
FAQ
Which apps should a real estate agent start with?
Start with a CRM you will update consistently, a reliable way to prepare listing content and a clear appointment process. Add specialist tools when a recurring task calls for them. Your brokerage’s existing tools may already cover some of these jobs.Do I need all 11 apps?
No. Several roles overlap. Keep one place for buyer records, one place for production tasks and the smallest set of content tools that produces the result you need. Try a workflow on one listing before expanding it.Can I use my own voice in a property video?
Yes. VideoTour.ai offers voice cloning, AI narrators and uploaded recordings. Use a voice you own or have explicit permission to reproduce, review the script and listen to the final result before sharing it.What is the difference between Loom, CapCut and VideoTour.ai?
Loom is useful for recording a personal screen-based explanation. CapCut helps edit footage and refine a social video. VideoTour.ai turns property photos and listing information into a prepared property video, with voiceover options. Choose according to the material you have and the output you need.