
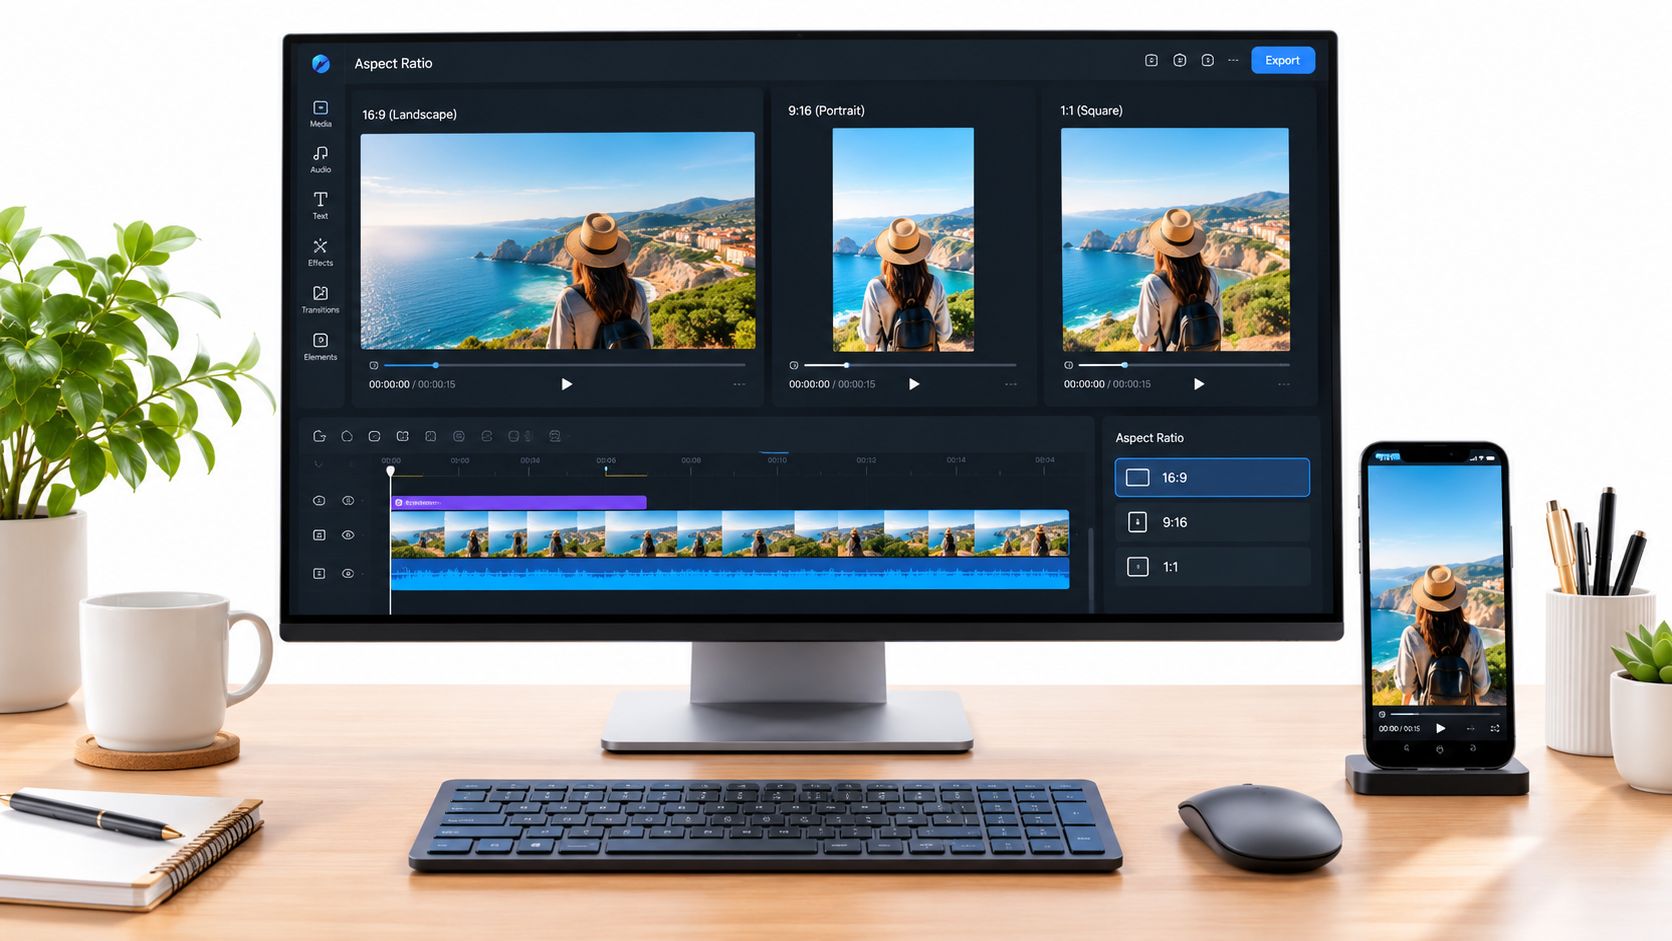
A property tour can look polished in a 16:9 YouTube player and still fail the moment you upload the same file as a Reel. The exterior sign disappears, the ceiling is clipped, and the agent's face ends up too close to one edge. The video hasn't changed creatively, but the frame has changed around it.
That's the main challenge in learning how to change video aspect ratio. You're not just selecting a preset. You're adapting one composition to several viewing environments without stretching people, hiding important details, or rebuilding the edit from scratch. The workflow below focuses on protecting faces, text, rooms, products, and branding while producing practical horizontal, square, and vertical versions.
That's the main challenge in learning how to change video aspect ratio. You're not just selecting a preset. You're adapting one composition to several viewing environments without stretching people, hiding important details, or rebuilding the edit from scratch. The workflow below focuses on protecting faces, text, rooms, products, and branding while producing practical horizontal, square, and vertical versions.
Summary
Create an AI Video Tours from PhotosTry it For Free
Why the Same Video Looks Different on Every Platform
A listing tour can leave the editing timeline perfectly intact and still look like a different production after upload. On YouTube, the full room may remain visible. In a vertical feed, the same shot can lose a window, sign, or person at the edge. The platform has changed how the frame is displayed, not what was edited inside it.
A player fits the file into its available display area and interface. Depending on the destination, it may scale the frame, crop its sides, add padding, or show it beneath controls and captions. Those choices affect how much of the original composition viewers can see. The export therefore needs to account for the destination before the final render.
Real estate, hospitality, and tour-style footage expose weak reframing quickly. A room often needs both walls in view. A hotel name may sit near one edge, while a kitchen island, window, artwork, or product detail explains the shot. A face is not always the only subject that matters. How to change video aspect ratio well means preserving that hierarchy while adapting the frame.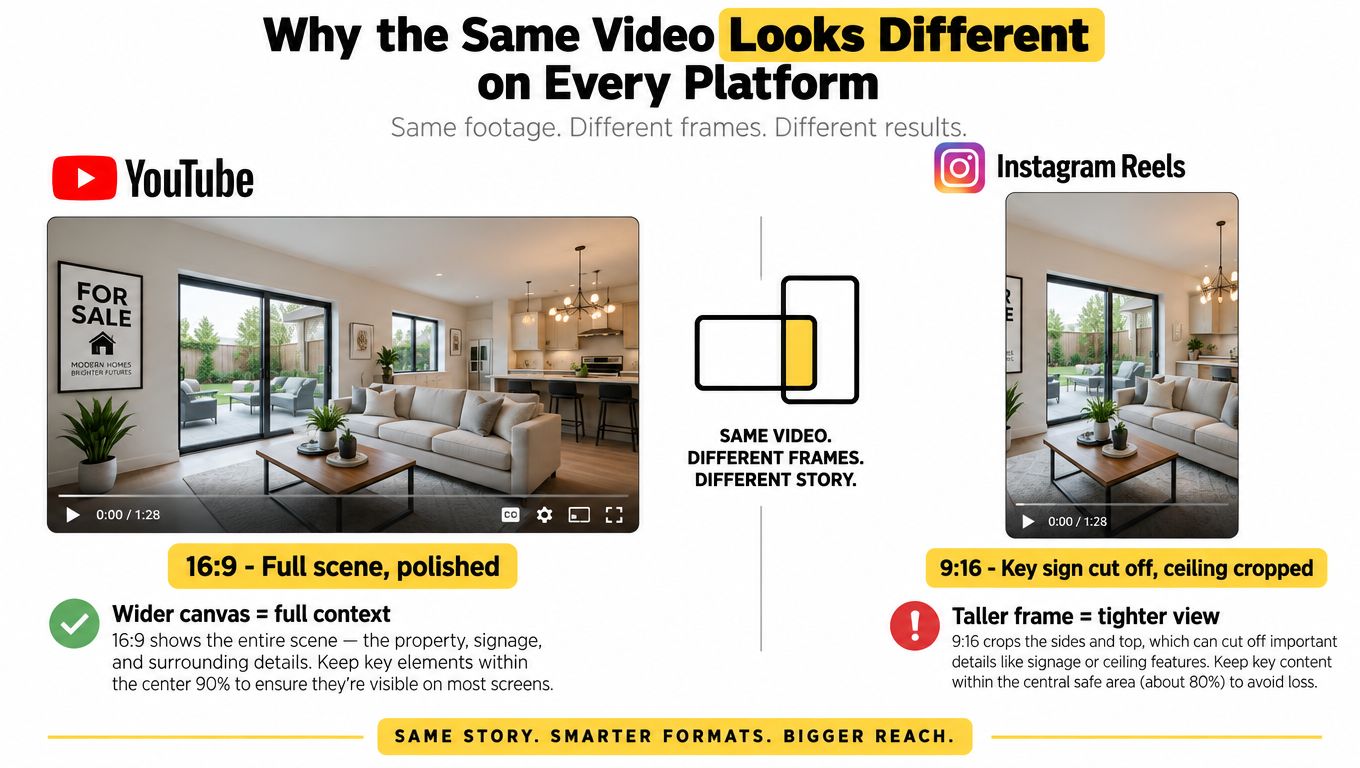
Set the sequence dimensions for the intended output before refining the composition. Keep faces, signs, titles, and important room features inside a central safe area, then adjust the crop or pan shot by shot. A single preset may produce a valid file while placing the subject in the wrong position or cutting away the detail that gives the shot meaning.
For repeated social versions, an automated reel creation workflow for marketers can reduce repetitive setup. Review every result before delivery. Automation can follow a face and still hide a property sign, clip a room edge, or place captions over the feature the viewer needs to see.
A player fits the file into its available display area and interface. Depending on the destination, it may scale the frame, crop its sides, add padding, or show it beneath controls and captions. Those choices affect how much of the original composition viewers can see. The export therefore needs to account for the destination before the final render.
Real estate, hospitality, and tour-style footage expose weak reframing quickly. A room often needs both walls in view. A hotel name may sit near one edge, while a kitchen island, window, artwork, or product detail explains the shot. A face is not always the only subject that matters. How to change video aspect ratio well means preserving that hierarchy while adapting the frame.
The three decisions that protect the frame
Identify the intended output ratio first. Then decide how the new frame should treat the original image:- Crop to fill: Remove parts of the source so the new frame is filled.
- Pad or letterbox: Keep the complete image and add space around it.
- Content-aware reframe: Track a person or object as the crop changes through the shot.
Set the sequence dimensions for the intended output before refining the composition. Keep faces, signs, titles, and important room features inside a central safe area, then adjust the crop or pan shot by shot. A single preset may produce a valid file while placing the subject in the wrong position or cutting away the detail that gives the shot meaning.
For repeated social versions, an automated reel creation workflow for marketers can reduce repetitive setup. Review every result before delivery. Automation can follow a face and still hide a property sign, clip a room edge, or place captions over the feature the viewer needs to see.
Understanding the Aspect Ratios That Actually Matter
An aspect ratio is the relationship between a video's width and height. A 16:9 frame is wider than it is tall, while 9:16 uses the same relationship in portrait orientation. The ratio describes shape, not image quality, codec, or frame rate.
The familiar HDTV frame is 1920×1080, which follows the 16:9 format. The modern 16:9 standard was proposed in 1983 by Joseph Nadan of Philips and later became associated with HDTV delivery. It was designed as a compromise between the older 4:3 television frame and wider cinema formats, a history documented by Popular Science's overview of movie aspect ratios.
Earlier broadcast and film workflows centered on 4:3 and the closely related 1.37:1 Academy ratio. The Academy of Motion Picture Arts and Sciences and the SMPE finalized the 35mm standard at 1.37:1 in 1932, after a 1929 agreement among major US studios around 1.33:1, according to this history of widescreen formats. That history explains why changing shape is an editorial problem, not merely a modern social-media preset.
The practical issue is visible when you try to turn 1920×1080 into 1080×1920 without cropping. The source and destination have opposite orientations, so you must remove part of the image, preserve it with padding, or place the full image inside a different canvas. You can't change the canvas dimensions alone and expect the original composition to survive.
For a workflow reference focused specifically on delivery formats, keep this guide to video aspect ratios alongside your editing project. In a mobile-first distribution plan, 9:16 and 4:5 deserve dedicated versions, while 16:9 remains important for YouTube, websites, and embedded property presentations.
The familiar HDTV frame is 1920×1080, which follows the 16:9 format. The modern 16:9 standard was proposed in 1983 by Joseph Nadan of Philips and later became associated with HDTV delivery. It was designed as a compromise between the older 4:3 television frame and wider cinema formats, a history documented by Popular Science's overview of movie aspect ratios.
Earlier broadcast and film workflows centered on 4:3 and the closely related 1.37:1 Academy ratio. The Academy of Motion Picture Arts and Sciences and the SMPE finalized the 35mm standard at 1.37:1 in 1932, after a 1929 agreement among major US studios around 1.33:1, according to this history of widescreen formats. That history explains why changing shape is an editorial problem, not merely a modern social-media preset.
| Platform or delivery context | Aspect ratio | Typical resolution | Best use |
|---|---|---|---|
| YouTube and horizontal web embeds | 16:9 | 1920×1080 HD | Full tours, landing pages, standard web video |
| Reels, TikTok, and Shorts workflows | 9:16 | Platform vertical preset | Mobile-first short-form edits |
| Instagram and LinkedIn feed posts | 1:1 | Platform square preset | Compact feed presentations |
| Portrait mobile feed posts | 4:5 | Platform portrait preset | Larger feed presence without full vertical framing |
| Cinematic letterbox delivery | 2.39:1 | Delivery-specific dimensions | Wide hero sequences and theatrical-style presentation |
For a workflow reference focused specifically on delivery formats, keep this guide to video aspect ratios alongside your editing project. In a mobile-first distribution plan, 9:16 and 4:5 deserve dedicated versions, while 16:9 remains important for YouTube, websites, and embedded property presentations.
Changing Aspect Ratio in a Web-Based Editor
Browser editors use slightly different labels, but the decision process is similar in Clipchamp, Kapwing, Canva, and comparable tools. The buttons may say Canvas, Resize, Size, Format, Fill, or Fit. Look for the control that changes the project frame, not only the size of an individual clip.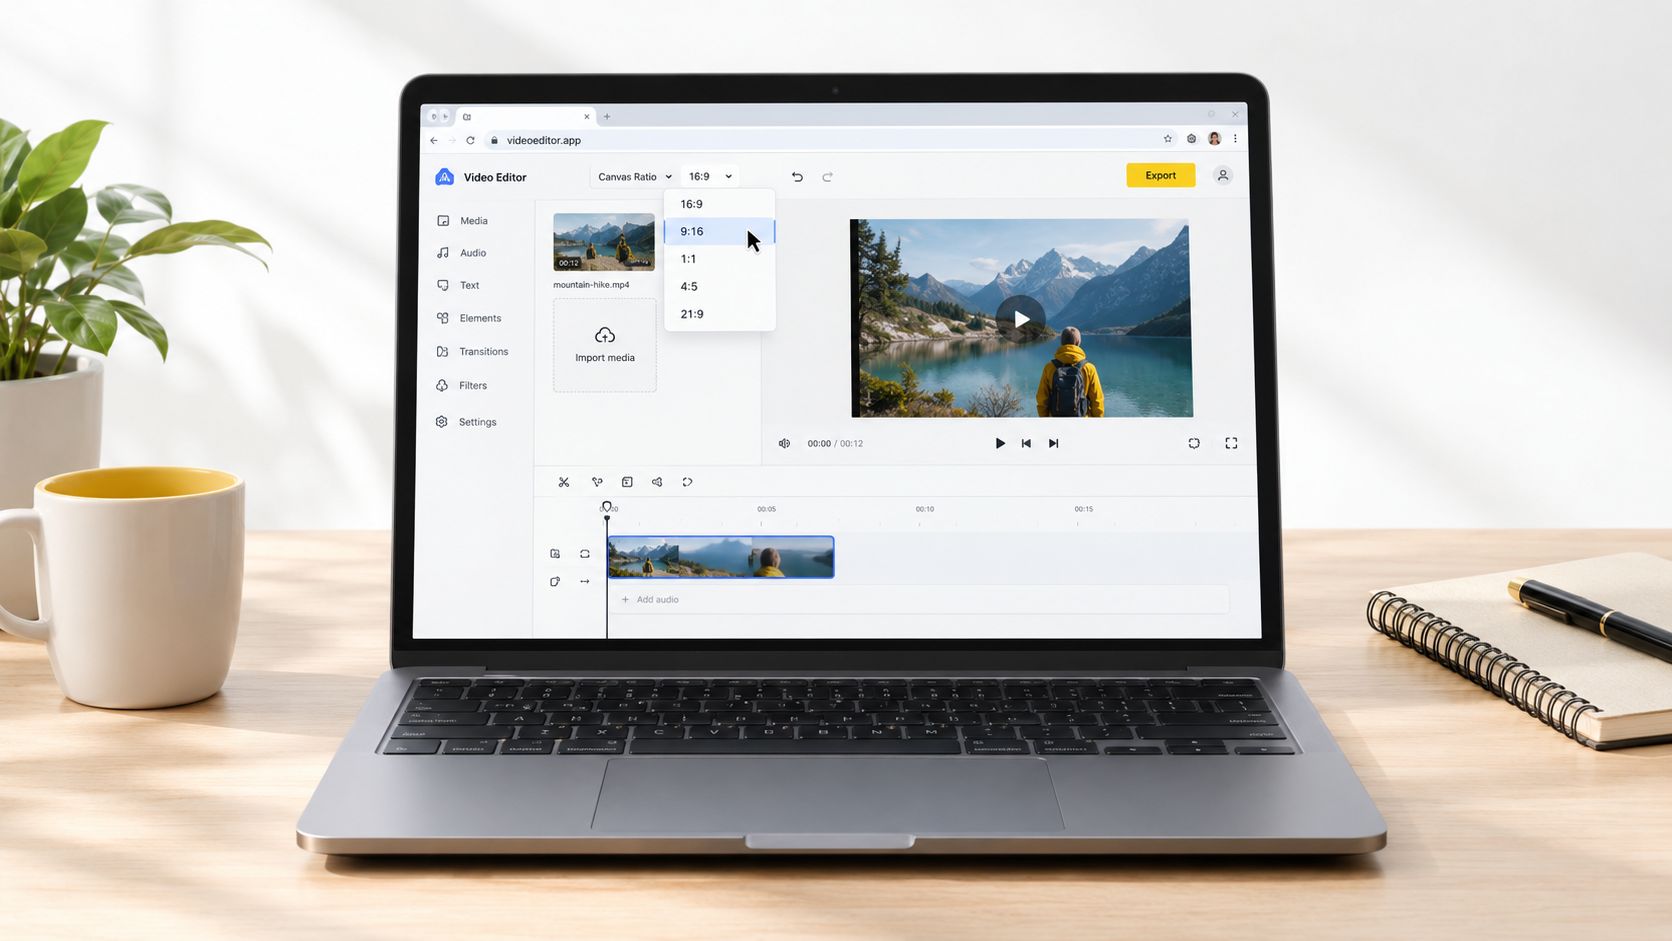
Use padding when the complete image matters more than filling every pixel. A cinematic hero shot may look intentional with bars, especially on a website or presentation. On a busy vertical feed, however, large unused areas can make the video feel smaller and less immediate.
Use a fit or letterbox treatment when you're protecting an architectural composition. If a camera moves across a room, inspect the whole movement rather than judging only the first frame. A crop that looks acceptable at the opening can remove the window or sign by the end.
For another workflow built around converting existing footage, this video aspect-ratio converter guide is a useful reference. The principle remains the same in every editor: change the project frame, inspect the content, then export. Clicking a preset and immediately rendering is how a clean tour becomes a sequence of half-cut heads and missing signage.
Set the project before fixing the clips
- Import the source. Create a new project and add the original footage. If the source is a conventional horizontal tour, the project will usually open in 16:9.
- Open the canvas or project-size menu. Select the target preset, such as 9:16 for a vertical social version or 1:1 for a square feed version.
- Preview the new frame before editing further. Don't assume the preset has preserved the important part of the shot. Scrub through every camera move, cut, title, and transition.
- Choose Fill or Fit deliberately. Fill crops the source to occupy the new frame. Fit preserves more of the original image and leaves bars or unused space.
- Reposition the footage. Drag the image within the canvas until the subject, text, and architectural lines sit correctly.
- Export from the target project. Choose the platform-appropriate format and review the rendered file outside the editor.
Decide between crop, pad, and resize
Use crop when the sides contain little useful information and the new frame needs to feel full. A close product shot or centered walk-and-talk may survive this well. A wide room, group, or storefront usually won't.Use padding when the complete image matters more than filling every pixel. A cinematic hero shot may look intentional with bars, especially on a website or presentation. On a busy vertical feed, however, large unused areas can make the video feel smaller and less immediate.
Use a fit or letterbox treatment when you're protecting an architectural composition. If a camera moves across a room, inspect the whole movement rather than judging only the first frame. A crop that looks acceptable at the opening can remove the window or sign by the end.
Check overlays separately
Text often creates a second crop problem. A title that sits safely in a horizontal composition can collide with interface elements or disappear near the top and bottom of a vertical player. Keep captions, logos, prices, property addresses, and calls to action away from the outer edges, then preview the export on a phone.For another workflow built around converting existing footage, this video aspect-ratio converter guide is a useful reference. The principle remains the same in every editor: change the project frame, inspect the content, then export. Clicking a preset and immediately rendering is how a clean tour becomes a sequence of half-cut heads and missing signage.
Re-rendering One Master Edit Into Multiple Ratios
A listing tour may need a vertical Reel, a square campaign asset, and a horizontal website version by the end of the day. Rebuilding each edit separately wastes time and creates continuity problems. Start with one polished master, then create controlled versions that preserve the story, pacing, music, captions, and branding.
Create the complete master timeline first. Duplicate that sequence for each delivery shape: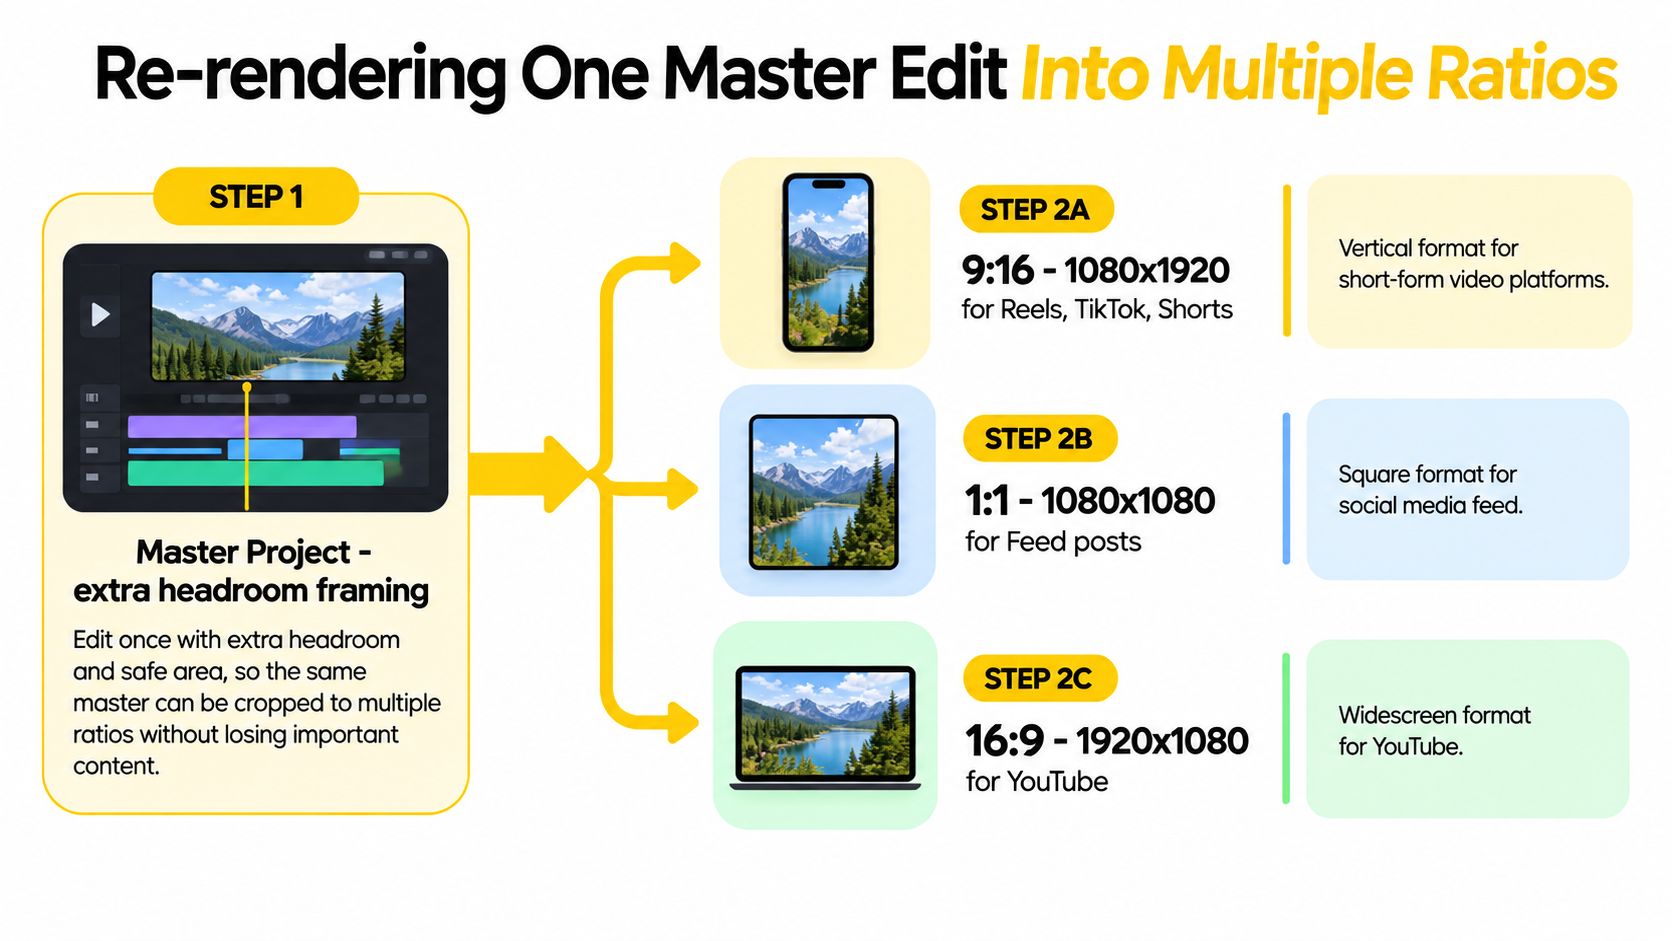
Keep the same starting point in every duplicated sequence so the opening title, first cut, and music cue stay synchronized. Then change only what the new frame demands. Adjust the framing, resize titles, or replace a shot that no longer explains the room. The narrative should remain intact.
For teams producing property tours from photo sets, VideoTour.ai can prepare horizontal, vertical, and square outputs through an editor with aspect-ratio controls. The video format help article provides practical guidance on available format choices. Whether the process is manual or automated, render each output separately and review it before delivery. A preset can change the frame, but it cannot confirm that the composition still serves the story.
Build for flexibility at the source
Select footage with enough space around the subject to support different frames. Keep important action near the center when practical, while preserving the natural geometry of the room or location. A hotel lobby, property tour, or walking route still needs to feel like a real place. A safe area helps protect the subject, but forcing every shot into the exact center makes the sequence flat.Create the complete master timeline first. Duplicate that sequence for each delivery shape:
- Vertical version: Set a 9:16 canvas for Reels, TikTok, and Shorts-style publishing.
- Square version: Use 1:1 when the destination or campaign calls for a compact feed asset.
- Horizontal version: Use 16:9 for YouTube, web embeds, and full-scene presentations.
Use an export queue and clear names
Name each file by property, edit, ratio, and revision. A pattern such as property-tour-vertical-v1, property-tour-square-v1, and property-tour-horizontal-v1 keeps a revised vertical file from replacing the horizontal master.Keep the same starting point in every duplicated sequence so the opening title, first cut, and music cue stay synchronized. Then change only what the new frame demands. Adjust the framing, resize titles, or replace a shot that no longer explains the room. The narrative should remain intact.
For teams producing property tours from photo sets, VideoTour.ai can prepare horizontal, vertical, and square outputs through an editor with aspect-ratio controls. The video format help article provides practical guidance on available format choices. Whether the process is manual or automated, render each output separately and review it before delivery. A preset can change the frame, but it cannot confirm that the composition still serves the story.
Crop, Letterbox, or Auto-Reframe
These methods solve different problems. The right choice depends on how crowded the frame is, how quickly the subject moves, and whether the background carries information that viewers need.
Crop is fast and often looks the most native to the destination. It works when the background is plain and the subject stays away from the edges. It fails on a room tour because the frame may remove a doorway, window, sign, or second person. It can also slice through a person when the camera pans.
Letterboxing protects the complete source image. That's useful when the composition itself is the point, such as a carefully framed hotel lobby or a cinematic exterior. The trade-off is visual weight. A wide image inside a tall feed frame can leave so much unused space that the important scene feels distant.
Auto-reframing follows movement and can save time on agent walk-and-talk footage. It isn't a final decision, though. Motion tracking may follow a reflection in a mirror, choose a background object, or shift toward a doorway when the speaker moves. Review faces, logos, text, and the destination of every pan.
For lightweight experimentation with crop-based formats, you can browse CropBass628 on OohYeah. Treat any automated or preset-based tool as a first pass, not as permission to skip the editorial check.
| Method | Best for | Main downside | Ideal subject |
|---|---|---|---|
| Crop to fill | Simple shots with spare space around the subject | Removes parts of the original scene | Centered products or close subjects |
| Letterbox or pad | Compositions where every edge matters | Leaves unused space in the new frame | Cinematic hero shots and wide rooms |
| Auto-reframe | Moving subjects across changing backgrounds | Can select the wrong object or crop at the wrong moment | Walk-and-talks and interviews |
Letterboxing protects the complete source image. That's useful when the composition itself is the point, such as a carefully framed hotel lobby or a cinematic exterior. The trade-off is visual weight. A wide image inside a tall feed frame can leave so much unused space that the important scene feels distant.
Auto-reframing follows movement and can save time on agent walk-and-talk footage. It isn't a final decision, though. Motion tracking may follow a reflection in a mirror, choose a background object, or shift toward a doorway when the speaker moves. Review faces, logos, text, and the destination of every pan.
For lightweight experimentation with crop-based formats, you can browse CropBass628 on OohYeah. Treat any automated or preset-based tool as a first pass, not as permission to skip the editorial check.
Practical rule: Use crop when the subject is simple, letterbox when the full composition matters, and auto-reframe when the subject moves. The more crowded or unpredictable the frame, the more manual review it needs.
Mistakes That Stretch or Cut Off Your Subject
The shortcut that causes the most damage is resizing the canvas while forcing the original image into the new dimensions. That isn't reframing. It's distortion. A round ceiling light becomes oval, straight door frames lean visually, and people appear wider or taller than they are.
Three export failures appear repeatedly in otherwise competent edits: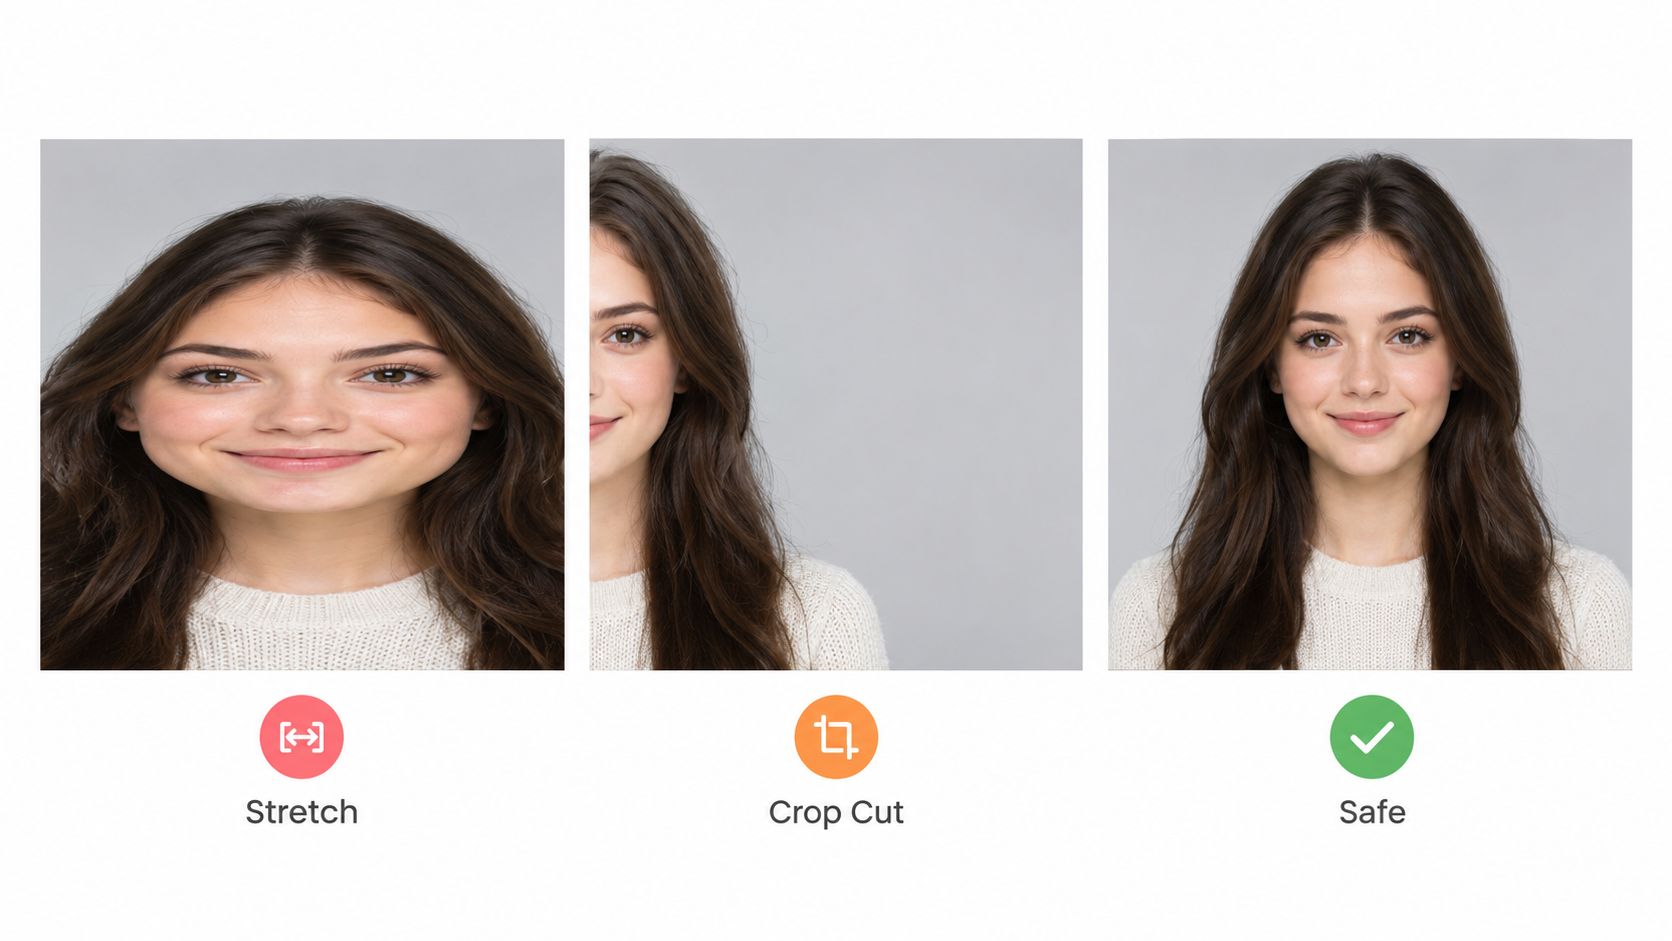 Before rendering, watch the complete output with the sound on and the interface in mind. Check the first frame, every title, every face, the final call to action, and any shot containing a sign or property detail. A technically valid file can still be unusable if its visual subject is hidden.
Three export failures appear repeatedly in otherwise competent edits:
- Stretched pixels: The editor changes width and height independently. Fix: choose crop, fit, or padding, and never force the image to fill by distorting it.
- Mismatched output settings: The canvas ratio and export dimensions don't agree. Fix: set the sequence to the intended delivery format before editing and use a destination-appropriate export preset.
- Overlay collisions: Captions, logos, prices, and buttons sit near the frame edges. Fix: move critical content into a safe area and inspect the upload preview, not only the editing canvas.
Before rendering, watch the complete output with the sound on and the interface in mind. Check the first frame, every title, every face, the final call to action, and any shot containing a sign or property detail. A technically valid file can still be unusable if its visual subject is hidden.A Repeatable Workflow and the Ratio to Master in 2026
A dependable multi-format workflow looks like this:
One useful test prevents wasted editing time: render a short 9:16 sample from any horizontal clip before committing to the full cut. If the subject, text, and movement survive that test, you can build the remaining versions with much more confidence.
VideoTour.ai can turn sets of property photos into branded video tours and provide editable horizontal, vertical, and square outputs for social and listing workflows. If you regularly adapt real estate, hospitality, or tour content across platforms, visit VideoTour.ai to test a workflow that handles the initial tour creation and format changes in one place.
- Capture with reframing in mind. Leave useful room around faces, products, signs, and room features instead of composing every shot tightly.
- Build one master timeline. Complete the story, audio mix, color treatment, captions, and branding once.
- Duplicate the sequence by ratio. Make separate 9:16, 1:1, and 16:9 versions so each output can be reviewed independently.
- Choose the least damaging frame treatment. Crop plain backgrounds, preserve important wide scenes with padding, and use auto-reframe only when tracking supports the shot.
- Preview on a phone. Check text, faces, room edges, and interface clearance at the size viewers will see.
- Keep export settings consistent. Match the source frame rate where appropriate, use a reliable H.264 delivery preset, and follow the current destination requirements for dimensions and file limits.
One useful test prevents wasted editing time: render a short 9:16 sample from any horizontal clip before committing to the full cut. If the subject, text, and movement survive that test, you can build the remaining versions with much more confidence.
VideoTour.ai can turn sets of property photos into branded video tours and provide editable horizontal, vertical, and square outputs for social and listing workflows. If you regularly adapt real estate, hospitality, or tour content across platforms, visit VideoTour.ai to test a workflow that handles the initial tour creation and format changes in one place.